DiY Tuesday: Repurposed Necktie Crafts
 By: Elizabeth Elliot
Neckties are one of those clothing items that seem to accumulate over the years. For the most part, they don’t go out of style for a long time and don’t take up much space. They’re also inexpensive to buy secondhand, which makes them perfect to use for our fun DIY projects.
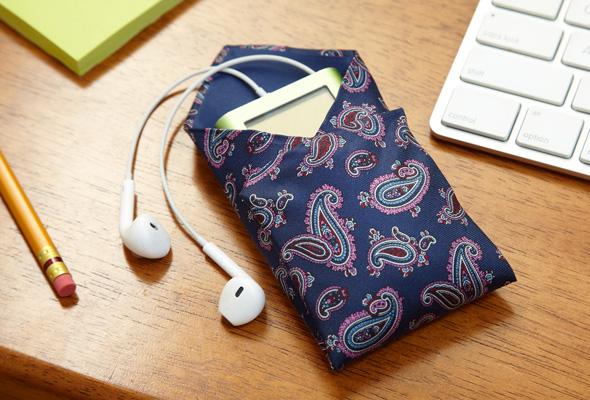
Necktie MP3/Phone Case
This practical phone case requires a bit of light sewing — but no machine required. Don’t get nervous — it only takes 30 minutes to complete the whole project. Don’t sew? Use a hot glue gun instead.
Materials
Necktie
Scissors
Needle and thread (or hot glue gun)
Instructions
1.To measure, lay the phone or music player on the end of the necktie, near the bottom of the larger point
2.Add 2 inches going toward the smaller end and cut
3.Take the shorter piece you just cut off, and cut all the seams on the back of the tie open (ensure that the device fits inside)
4.Choose a fun coordinating color and thread your needle
5.Loop it around so the ends are matching and tie a knot to secure them both together
6.Start by sewing (or gluing) up the center, creating a simple seam to connect both edges again.
7.Gauge tightness by leaving your device inside the tie (being extra careful if you’re using glue)
8.Fold up the bottom — like you are wrapping a present — and sew (or glue) that in place with a simple seam (pin it in place before you adhere the fabric together)
9.Take the loop that was part of the back of the tie and sew each end onto the sides of the holder, then trim off the excess fabric.
Necktie Fabric Wreath
Create this is really simple, festive wreath using only one tie.
Materials
Necktie
Embroidery hoop
Scissors
Ribbon
Instructions
1.Deconstruct the tie by ripping or cutting all of the seams and removing the padding and liner.
2.Cut the remaining fabric into 1-inch strips. Cut the tie lengthwise so strips are 1 inch tall by about 6 inches wide.
3.Working your way around the embroidery hoop, tie the fabric pieces in a simple knot
4.Tie a loop of ribbon around the top for hanging
5.Add a pretty ribbon bow
6.Repeat until the wreath is as full as you’d like
Elizabeth and her pal, Candie, are co-founders of Craftbaby. Find their insight on anything — whether it’s painting office walls pink (home décor), chasing after a messy toddler (parenting), creating because they’re too cheap (DIY) or cooking without wheat so they don’t get puffy (recipes).
Editor’s Note: This article is not owned by the Meigs Independent Press, all rights go to Elizabeth Elliot.